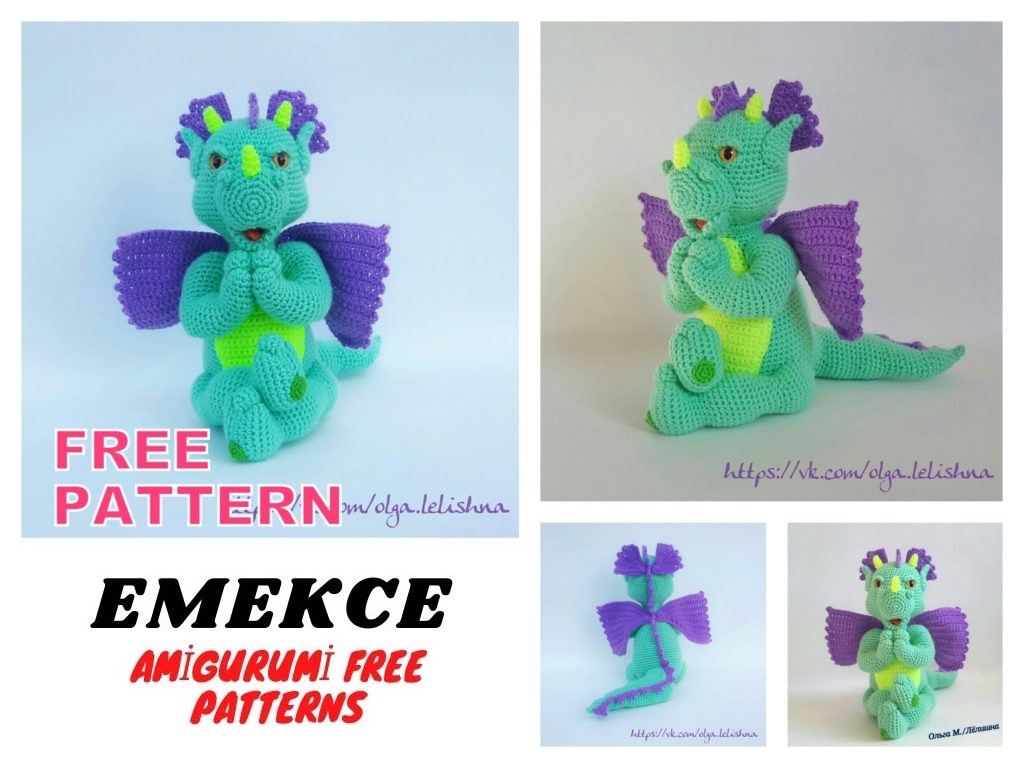
Amigurumi Dragon Free Crochet Pattern
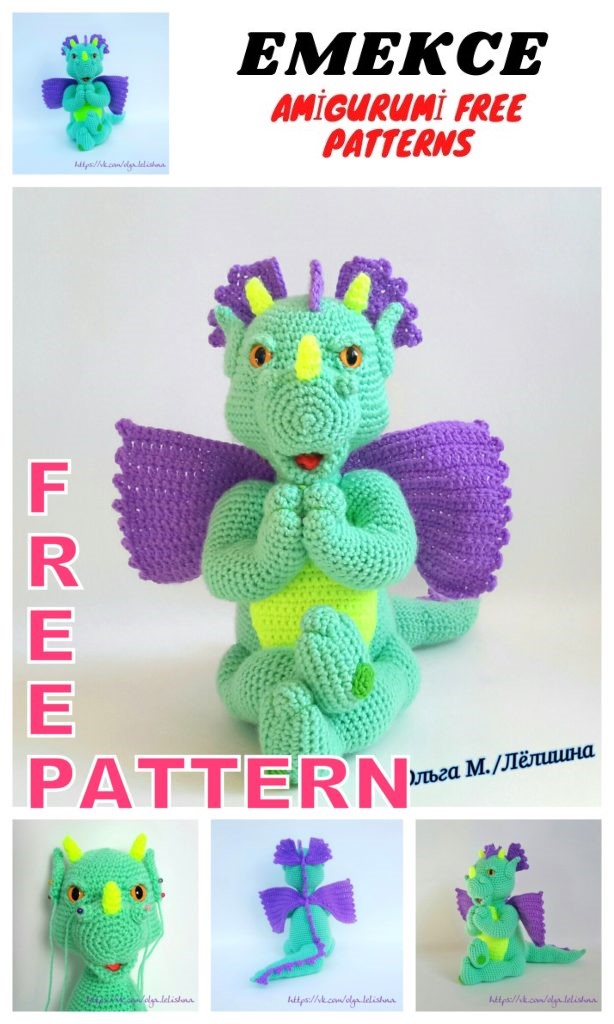
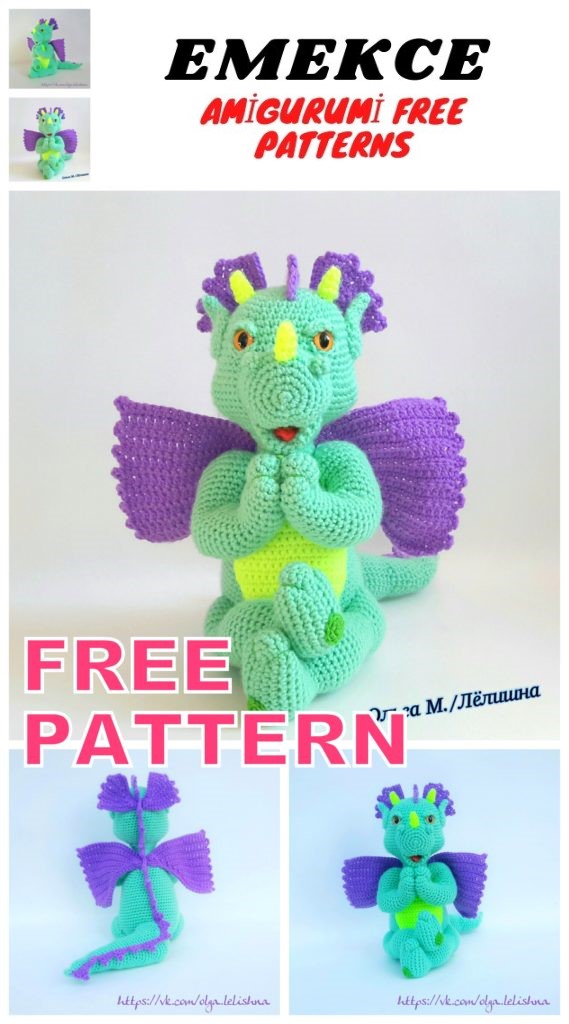
Are you ready to embark on a crochet adventure that will lead you to the mystical world of amigurumi dragons? Look no further because we have an enchanting and free crochet pattern just for you. With this pattern, you can bring to life a captivating amigurumi dragon that’s sure to be the centerpiece of your collection or a magical gift for someone special.
In this crochet tutorial, we will guide you through the process, step by step, ensuring that even if you’re new to amigurumi, you’ll be able to create a magnificent dragon. From selecting the right yarn colors to crafting the intricate details, we’ve got you covered.
So, gather your crochet hooks and unleash your creative fire as we embark on this exciting journey to create your very own amigurumi dragon. Let’s dive in and watch your imagination take flight!
Materials:
– Pekhorka yarn
“Children’s novelty”
Colors: violet,
Unripe lemon
“Spring” (you can
choose other colors.
The main thing is that they be
in harmonious color
gamma);
– safe eyes 12
mm (I have cats);
– hook 2.00;
– scissors;
– needle for stitching
details;
– filler.
TERMS USED
ch – chain
sc. – single crochet
sl-st – slip stitch
HDC – half double crochet
DC – double crochet
inc. – increase (knitting in one loop of the base of two columns)
dec – decrease (knitting two columns together)
Some parts fit in a circle – each row in them ends
connecting column and starts with the lifting loop.
Some parts fit in a spiral. Displacement loops are used.
In the description, the method of knitting the part is indicated. Please be careful.
3 HEADS (knitting in a circle):
1 row – 6 sc.into magic ring
2 row – (inc.) * 6 – (12)
3 row – (1 sc., İnc.) * 6 – (18)
4 row – (2 sc., İnc.) * 6 – (24)
5 row – (3 sc., İnc.) * 6 – (30)
6 row – 30 sc.
7 row – (4 sc., İnc.) * 6 – (36)
8 row – 36 sc.
9 row – (5 sc., İnc.) * 6 – (42)
10 row – (6 sc., İnc.) * 6 – (48)
11-15 rows – 48 sc each.
16th row – 10 sc., 2 inc., 16 sc., 2 inc., 18 sc. – (52)
17th row – 10 sc., 4 inc., 17 sc., 4 inc., 17 sc. – (60)
18-19 rows – 60 sc each.
20 row – 14 sc, dec, 24 sc., Dec, 18
sc. – (58)
21 row – 14 sc., Dec, 23 sc., Dec, 17
sc. – (56)
22 row – 13 sc., 2 dec, 20 sc., 2 dec,
15 sc. – (52)
23 row – 12 sc., 2 dec, 18 sc., 2 dec,
14 sc. – (48)
24 row – (4 sc., Dec) * 8 – (40)
25 row – (6 sc., Dec) * 5 – (35)
26 row – 2 sc., (5 sc., Dec) * 5 – (30)
Finish, fasten the thread, leaving the tip for sewing.
The detail is packed tight enough.
As you can see, the front of the head is flatter.
The eyes are fixed between 11 and 12 rows. Between the eyes 10 sc.
I do not recommend rushing with eyes: first, it is better to sew on the upper part
faces and only then insert eyes, because you may not be happy
my proposed eye arrangement and want to do it my own way.
4 Postpone work with eyes until you have all the main
head and torso details.
Muzzle. Top part. (knitting in a circle):
1 row – 6 sc. into magic ring
2 row – (inc.) * 6 – (12)
3 row – (1 sc., İnc.) * 6 – (18)
4 row – (2 sc., İnc.) * 6 – (24)
5 row – (3 sc., İnc.) * 6 – (30)
6 row – 6 sc., 3 inc., 12 sc., 3 inc., 6 sc. –
(36)
7 row – 36 sc.
8 row – 6 sc., 3 inc., 7 sc., Dec, 7 sc., 3 inc., 6 sc., Dec – (40)
9 row – (6 sc., Dec) * 5 – (35)
Finish, leave the thread for
sewing on. Detail a little stuff
and prick (better if
the needles in them will be long) to the head,
choosing the optimal position.
The lower part of the muzzle is slightly
rises. Sew on, not
forgetting to add filler. WITH
stuffing is not worth it,
the part must be plastic.
Muzzle. Bottom part.
(knitting in a circle):
1 row – 6 sc. into magic ring
2 row – (inc.) * 6 – (12)
3 row – (1 sc., İnc.) * 6 – (18)
4 row – (2 sc., İnc.) * 6 – (24)
5 row – (3 sc., İnc.) * 6 – (30)
Fold the item and knit through both
side 15 sc.
Attention! Sew on part only
after assembling it with the tongue and after
joints of the head with the body.
5 LANGUAGE (knitting in a circle):
Scarlet thread in the amigurumi ring
knit like this: 1 sc., 1 HDC, 2 DC,
1 HDC, 1 sc.
Leave the thread for sewing.
Sew to the inside of the bottom
parts of the muzzle.
BODY (knitting in a circle):
1 row – 6 sc. into magic ring
2 row – (inc.) * 6 – (12)
3 row – (1 sc., İnc.) * 6 – (18)
4 row – (2 sc., İnc.) * 6 – (24)
5 row – (3 sc., İnc.) * 6 – (30)
6 row – (4 sc., İnc.) * 6 – (36)
7 row – (5 sc., İnc.) * 6 – (42)
8 row – (6 sc., İnc.) * 6 – (48)
9 row – (7 sc., İnc.) * 6 – (54)
10 row – (8 sc., İnc.) * 6 – (60)
11-20 rows – 60 sc each.
21 row – (8 sc., Dec) * 6 – (54)
22-24 rows – 54 sc.
25 row – (7 sc., Dec) * 6 – (48)
26-27 rows – 48 sc.
28 row – (6 sc., Dec) * 6 – (42)
29-30 rows – 42 sc each.
31 row – (5 sc., Dec) * 6 – (36)
32 row – 36 sc.
33 row – (4 sc., Dec) * 6 – (30)
34 row – (3 sc., Dec) * 6 – (24)
35-37 rows – 24 sc.
38 row – (2 sc., Dec) * 6 – (18)
6 39-40 rows – 18 sc.
41 row – (2 sc., İnc.) * 6 – (24)
42 row – (3 sc., İnc.) * 6 – (30)
Finish, leave the thread for
sewing on. Detail stuff
tight enough. If to the head
the upper part of the muzzle is sewn
and inserted eyes, then you can
sew the head to the body.
After that, you can sew
lower part of the muzzle (see photo)
HORNS 3 children (knitting in a spiral):
1 row – 4 sc. into magic ring (as the part is small and
initial number of columns
small, I recommend knitting not KA, but
a chain of 2 ch and a primary number of sc.
knit the chain in the first loop)
2 row – 4 sc.
3 row – (1 sc., İnc.) * 2 – (6)
4 row – 6 sc.
Finish, leave the thread for sewing. Details to fill in whenever possible.
UPPER EYELID. 2 details:
1 row – chain of 6 ch, turn
2 row – 4 sc., 1 sl-st
Finish, leave the thread for
sewing on.
LOWER CENTURY. 2 details:
Chain of 5 ch
To finish. Leave a thread for
sewing on.
Eyelids chop around the eyes
pins choosing
optimal position and slightly
pulling them. Sew on.
7 HAND. 2 details (spiral knitting):
1 row – 3 ch + 1 ch; we knit in the 2nd loop from the hook
2 row – 2 sc., 3 sc. In 1 p., On the other side of the chain – 1 sc., 1 inc. – (eight)
3 row – inc., 1 sc., 3 inc., 1 sc., 2 inc. – (1.4)
4th row – 1 sc., İnc., 1 sc., (İnc., 1 sc.) * 3, 2 sc., İnc., 1 sc., İnc. – (20)
5-9 rows – 20 sc each.
10 row – (dec, 8 sc.) * 2 – (18)
11 row – dec, 16 sc. – (17)
12 row – 8 sc., Dec, 7 sc. – (16)
13 row – 8 sc., İnc., 7 sc. – (17)
14th row – 17 sc.
15 row – 9 sc., İnc., 7 sc. – (18)
16 row – 18 sc.
17th row – 11 sc., İnc., 6 sc. – (19)
18 row – 19 sc.
1 offset loop
19 row – 12 sc., İnc., 6 sc. – (20)
20 row – 1 sc., 2 dec, 7 sc., 2 inc., 6 sc. – (20)
21 row – 1 sc., Dec, 8 sc., 2 inc., 6 sc., Dec – (20)
22 row – 2 inc., 7 sc., 2 dec, 6 sc. – (20)
23 row – 2 sc., 2 inc., 7 sc., 2 dec, 5 sc. – (20)
1 offset loop
24 row – 3 sc., İnc., 8 sc., Dec, 6 sc. – (20)
25 row – 20 sc.
26 row – 4 sc., İnc., 8 sc., Dec, 5 sc. – (20)
27 row – 20 sc.
28 row – 5 sc., İnc., 8 sc., Dec, 4 sc. – (20)
29 row – (4 sc., İnc.) * 4 – (24)
30 row – (3 sc., İnc.) * 6 – (30)
31 row – 30 sc.
8 32 row – (4 sc., Dec) * 5 – (25)
33 row – (4 sc., Dec) * 4 – (20)
Start stuffing the part.
2 offset loops
34 row – 6 sc., Dec, 8 sc., Dec, 2
sc. – (18)
35 row – (2 sc., Dec) * 5 – (15)
36 row – (1 sc., Dec) * 5 – (10)
To the top of the part
add filler completely
bit she shouldn’t be
voluminous, but only slightly
to form a shoulder.
Pull the hole. Leave
thread for sewing.
LEG. 2 details (spiral knitting):
1 row – a chain of 8 ch + 1 ch; we knit in the 2nd loop from the hook
2 row – 7 sc., 3 sc. In 1 p., On the other side of the chain – 6 sc., İnc. – (18)
3 row – inc., 6 sc., 3 inc., 6 sc., 2 inc. – (24)
4 row – inc., 9 sc., 3 inc., 9 sc., 2 inc. – (30)
5-7 rows – 30 sc each.
8 row – 10 sc., 5 dec, 10 sc. – (25)
9 row – 8 sc., 4 dec, 8 sc. – (20)
1 offset loop
10 row – 8 sc., 3 dec, 8 sc. – (19)
11 row – 6 sc., 3 dec, 6 sc. – (15)
12 row – 15 sc.
13 row – (3 sc., İnc.) * 4 – (19)
14th row – 19 sc.
15 row – (4 sc., İnc.) * 4 – (23)
16-20 rows – 23 sc each.
21 row – (4 sc., Dec) * 4
22 row – 7 sc., 2 dec, 6 sc., 2 inc. – (19)
23 row – 8 sc., Dec, 6 sc. 2 inc. – (19)
24th row – 7 sc., 2 dec, 7sc., 2 inc. – (20)
25 row – 18 sc., İnc. – (20)
1 offset loop
26 row – 8 sc., 2 dec, 7sc., 2 inc. – (21)
27 row – 3 sc., İnc., 3 sc.,
2 dec, 3 sc., İnc., 3 sc.,
inc., 1 sc. – (21)
28 row – 3 sc., İnc., 3 sc.,
inc., 2 dec, inc., 3 sc., inc., 5
sc. – (24)
29 row – (3 sc., İnc.) * 6 –
(thirty)
30-33 rows – 30 sc each.
34 row – (3 sc., Dec) * 6 – (24)
35 row – (2 sc., Dec) * 6 – (18)
We begin to stuff the part. Add to the top of the filler
very, very slightly, just to indicate the hip.
36 row – (1 sc., Dec) * 6 – (12)
37 row – (dec) * 6 – (6)
Pull the hole. Leave
thread for sewing.
NOSTRIES. 2 details:
Chain of 2 ch, 2nd from
we knit the hook
6 sc., Sl-st.
Do not stuff the part. Leave
thread for sewing.
EARS. 2 details. (knitting by
spirals):
1 row – 4 sc. into magic ring
10 2 row – 4 sc. – (4)
3 row – (1 sc., İnc.) * 2 – (6)
4 row – 6 sc.
5 row – (1 sc., İnc.) * 3 – (9)
6 row – 9 sc.
7 row – (2 sc., İnc.) * 3 – (12)
8-10 rows – 12 sc.
11 row – (dec) * 6 – (6)
Finish, leave the thread for
sewing on. Item not
to stuff. Hole
pull off.
Lining on the belly.
(knitting rotary
in rows):
1 row – 4 ch + 1 ch
2 row – 4 sc., 1 ch
3 row – inc., 2 sc., İnc., 1 ch
4 row – 6 sc.
5 row – inc., 4 sc., İnc.
6 row – 8 sc.
7 row – 3 sc., 2 inc., 3 sc.
8-9 rows – 10 sc.
10 row – inc., 8 sc., İnc.
11 row – 12 sc.
12 row – 5 sc., 2 inc., 5 sc.
13 row – 14 sc.
14th row – inc., 12 sc., İnc.
15-20 rows – 16 sc.
21 row – dec, 12 sc., Dec
22 row – 14 sc.
23 row – dec, 10 sc., Dec
11 24 row – 12 sc.
25 row – dec, 8 sc., Dec
26 row – 10 sc.
27 row – dec, 6 sc., Dec
28 row – 8 sc.
29 row – dec, 4 sc, dec
30 row – 6 sc.
31 row – dec, 2 sc., Dec
32 row – 4 sc.
33 row – 2 dec, do not turn. Tie part sc. round. At the corners of
2 sc. total 68 sc.
TAIL. 1 piece (knitting in a spiral):
1 row – 4 sc. into magic ring
2 row – 4 sc. – (4)
3 row – (1 sc., İnc.) * 2 – (6)
4 row – 6 sc.
5 row – (1 sc., İnc.) * 3 – (9)
6 row – 9 sc.
7 row – (2 sc., İnc.) * 3 – (12)
8-12 rows – 12 sc.
13 row – 5 inc., 2 sc., Dec, 1 sc., Dec – (15)
14th row – 15 sc.
15 row – 3 sc., 5 inc., 3 sc., 2 dec – (18)
16 row – 18 sc.
17 row – 5 sc., 5 inc., 4 sc., 2 dec – (21)
18-19 rows – 21 sc.
20 row – 2 dec, 3 sc., 7 inc., 3 sc., 2 dec – (24)
21-22 rows – 24 sc.
23 row – 11 sc., 2 inc., 11 sc. – (26)
24-25 rows – 26 sc each.
12 2 offset loops
26 row – dec, 10 sc., 2 inc.,
10 sat., Dec – (26)
27 row – 26 sc.
28 row – 12 sc., 2 inc., 12
sc. – (28)
29-30 rows – 28 sc.
2 offset loops
31-32 rows – dec, 11 sc., 2
inc., 11 sc., dec – (28)
33 row – 28 sc.
Now we knit rotary
in rows and conditionally
we denote this by 34 next:
20 sc, sl-st, turn. Everywhere we skip after turning sl-st and knit
10 sc, sl-st, turn
11 sc., Sl-st, turn
12 sc., Sl-st, turn
16 sc., Sl-st, do not rotate
35 row – inc, 22 sc., 2 inc. – (28)
36 row – 28 sc.
Again, we knit in rotary rows and conventionally denote this by 37 side by side:
sl-st, turn. After the threshold, skip sl-st and knit
27 sc, sl-st, turn
sl-st, 24 sc, sl-st, turn
sl-st, 22 sc., sl-st, turn
sl-st, (2 sc., dec) * 5, 3 sc. don’t turn
38 row – 20 sc.
To finish. Leave the thread for sewing. Detail to stuff.
WINGS ON THE BACK. 2 details (knitting in rotary rows):
When turning on a chain, we skip the sl-st of the previous row.
1 row – a chain of 24 ch + 1 ch, we knit from the 2nd loop of the chain
13 2 row – 8 sc., Sl-st, turn
3 row – 2 sc., 2 HDC, 2
DC, 2 sc., 3 ch + 1 ch,
turn
4 row – 10 sc., Sl-st, turn
5 row – 3 sc., 3 HDC, 3
DC, 1 HDC, 3 ch + 1
ch, turn
6 row – 12 sc., Sl-st, turn
7 row – 3 sc., 3 HDC, 4
DC, 2 HDC, 3 ch + 1
ch, turn
8 row – 14 sc., Sl-st, turn
9 row – 4 sc., 4 HDC, 4
DC, 2 HDC, 3 ch + 1
ch, turn
10 row – 16 sc., Sl-st, turn
11 row – 4 sc., 5 HDC, 5 DC, 2 HDC, 3 ch + 1 ch, turn
12 row – 18 sc., Sl-st, turn
13 row – 5 sc., 6 HDC, 5 DC, 2 HDC, 3 ch + 1 ch, turn
14 row – 20 sc., Sl-st, turn
15 row – 5 sc., 6 HDC, 7 DC, 2 HDC, 3 ch + 1 ch, turn
16 row – 22 sc., Sl-st in the last loop of the chain, turn
17 row – 7 sc., 7 HDC, 7 DC, 1 HDC, 3 ch + 1 ch, turn
18 row – sc. to the end of the row, 3 sc. into the first loop of the base and further along
primary chain. It turns out like this: on one side of the wing 22 sc, 3 sc.
in the first loop of the chain, 22 sc. on the other side of the wing. To finish.
Hide the tip of the thread with a needle in the wing.
WINGS ON THE HEAD. 2 details (knitting in rotary rows):
We knit a chain of 12 ch + 1 ch in the 2nd from the hook we knit a loop
1 row – 4 sc., Sl-st, turn
2 row – 2 sc., 2 HDC, 3 ch + 1 ch, turn
3 row – 6 sc., Sl-st, turn
14 İnto magic ring each row back last three sc. we knit like this: sc. in sl-st
previous row, sc. in sl-st on a chain from ch, sc. into the next loop of the chain
from ch, and sl-st back into the free chain loop.
4 row – 2 sc., 2 HDC, 2 sc., 3 ch + 1 ch, turn
5 row – 8 sc., Sl-st, turn
6 row – 2 sc., 2 HDC, 2 DC, 2 HDC, 3 ch + 1 ch, turn
7 row – 10 sc., Sl-st, turn
8 row – 3 sc., 3 HDC, 2 DC, 2 HDC, 3 ch + 1 ch, turn
9 row – tie the wing on two sides: 10 sc. on one side, 3 sc.
in the initial loop of the chain, 10 sc. on the other side of the wing.
CREST. 1 item:
Link a chain of 80 ch + 1 ch
(sc., HDC, 3 DC in one loop of the base and average st. with picot of 3 ch,
HDC) – repeat to the end of the row. It turns out 19 scallops.
ASSEMBLY:
Poke legs and tail on the body with pins, choosing the best
position. The toy should sit resting on its tail and legs.
If satisfied with the situation. Then sew the details in a circle.
On my feet do
drawstring forming
fingers. Better to take
contrasting but
suitable for
color thread. In my
case body color –
“Spring”, and the color of the thread
for tightenings and for
heels on the foot –
“Exotic.”
FIVE. 2
Details:
1 row – 5 sc into magic ring
2 row – (inc.) * 5 – (10)
Finish leave
thread for
sewing on.
15 Sew the heel to the foot.
Sew overlay on
tummy.
Hands prick
pins to the body,
trying on position.
Hands should be
lowered along the body,
slightly elbows
forward since then
you need to bend them
connect palms.
Make the weights on your hands
forming fingers.
Hands sew in a circle in
shoulder part which
packed with us lightly.
Put your palms together
stitching them not through and through, but only internally with each other.
Sew palms to the chest with a few stitches to form a pose
Namaste; palms are located under the lower lip.
Chop the comb from the forehead to the tail, choosing the optimal position,
strictly in the middle of the body. Sew on.
Chop wings, choosing the optimal position. Wings tight
adjacent to the ridge. Sew wings only at their top.
Your
Xemerius
ready.
I wish him
good
pens.

