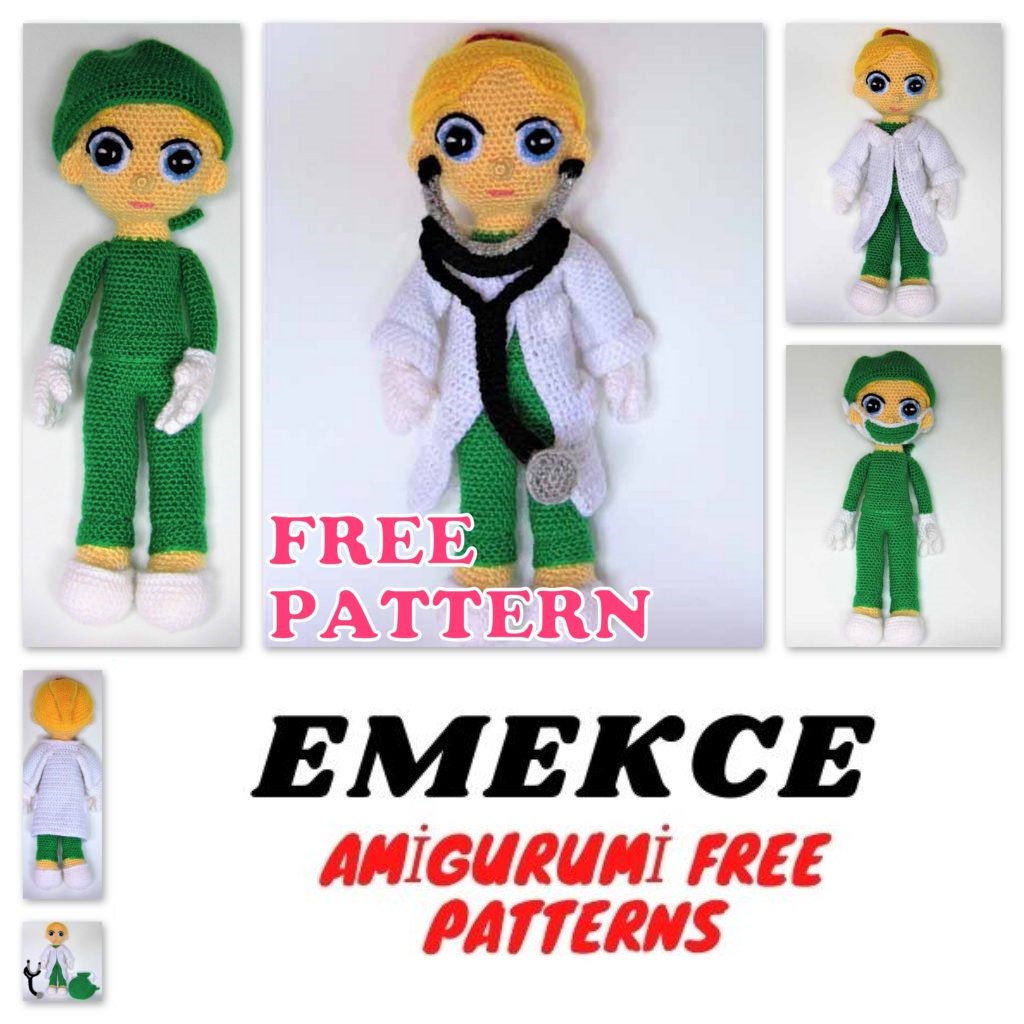
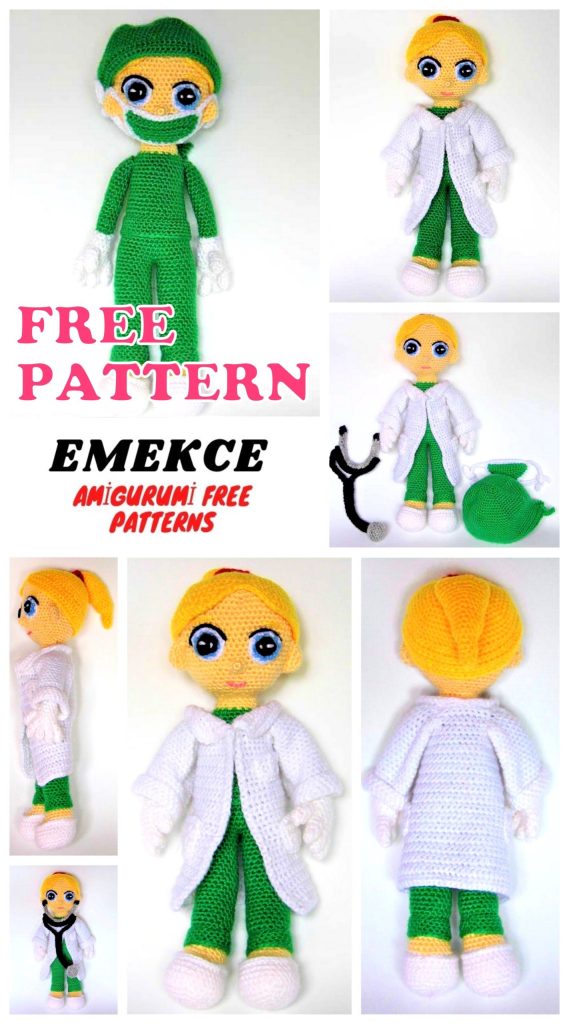
Crafting Care: Meet the Amigurumi Female Doctor – Free Crochet Pattern
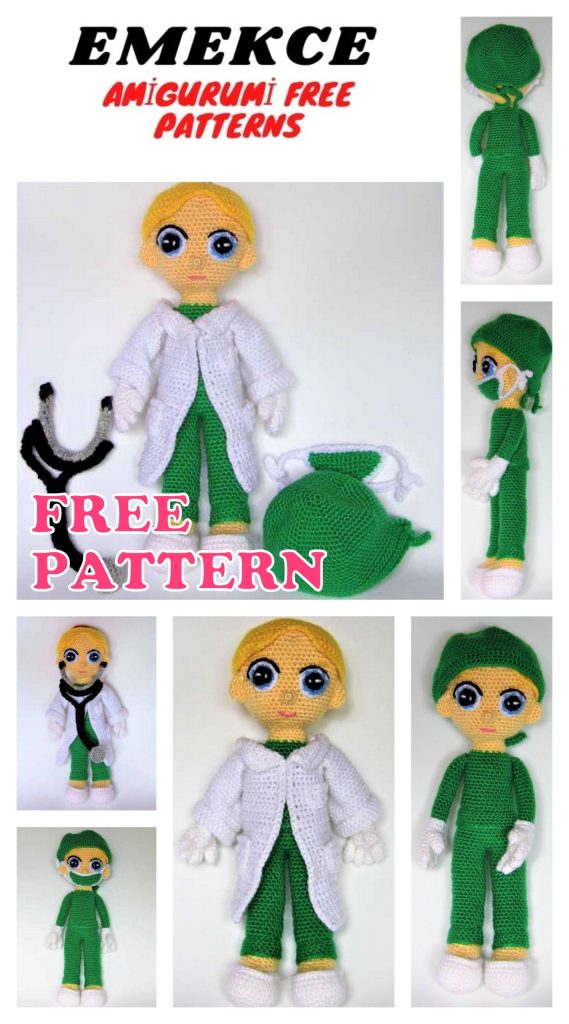
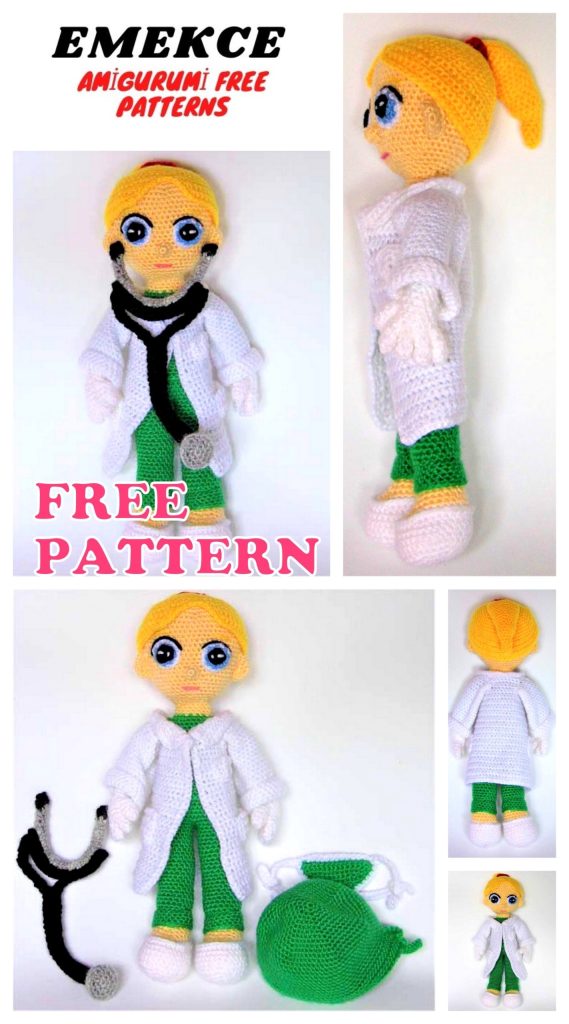
Step into the world of amigurumi and discover a crochet pattern that celebrates compassion and care with our Amigurumi Female Doctor. This free crochet pattern introduces you to the charming and skilled crochet character, ready to bring a smile to your face and warmth to your heart.
The Amigurumi Female Doctor is not just a delightful crafting project; she embodies the spirit of healing and nurturing. This pattern is perfect for both experienced crocheters and those new to the craft. With clear and easy-to-follow instructions, you can create your very own crochet doctor doll, complete with adorable medical accessories.
Crafting this amigurumi doctor is not only a creative endeavor but also an opportunity to pay tribute to healthcare professionals worldwide. Whether you’re crocheting her for yourself or as a thoughtful gift for a healthcare worker or aspiring doctor, this pattern captures the essence of dedication and care.
Imagine the joy on someone’s face when they receive this handmade amigurumi doctor, a symbol of appreciation and admiration for those who dedicate their lives to the well-being of others.
So, gather your crochet hooks and your favorite yarn, and embark on a journey of creativity and compassion. Crocheting the Amigurumi Female Doctor is a beautiful way to express gratitude and admiration for healthcare heroes.
Start crafting your amigurumi doctor today with this free crochet pattern, and let your hands create a little guardian of health and happiness, one stitch at a time!
Materials
– Yarn of different colors: white, black, skin color,
yellow, red, light gray, green, light blue, light pink.
– Thickness of the yarn: 3 mm.
– Hook according to the thickness of the yarn.
– Yarn needle.
– Fiberfill.
Abbreviations
sc: single crochet
st: stitch
ch: chain
inc: increase
dec: decrease
Fill the doll with fiberfill as you crochet.
if you have doubts, visit:
The Amigurumi Tutorials
FEET / LEGS (x2)
With white yarn
1. Work 6 sc in magic ring.
2. Inc in every st (12).
3. “1 sc, inc”, repeat to the end of the round
(18).
4. “2 sc, inc”, repeat (24).
5. “3 sc, inc”, repeat (30).
6. To 9. 1 sc in each st (30).
10. Work in back loops only 1 sc in each st (30).
You will return to this round to complete the
shoes.
11. Change to skin color yarn and dec 6. Work 1
sc in each st to the end of the round (24).
12. Dec 3, 1 sc in each st to the end of the
round (21).
13. Dec 2, 1 sc in each st to the end of the
round (19).
14. Dec 1, 1 sc in each st to the end of the
round (18).
15. and 16. 1 sc in each st (18).
17. Change to green yarn and work 1 sc in each
st (18).
18. Work in back loops only 1 sc in each st (18).
You will return to this round to complete the
pants.
19. To 40. 1 sc in each st (18).
Fasten off the first leg. Follow the pattern to
make the second leg and do not fasten off to
join both legs.
Joining Legs:
Place one leg next to the other leg; mark the
center point between legs. Crochet in the leg
that is not fastened off 1 sc in each st until you
get the marker, then work 1 slip st.
Join the first leg with a sc, then sc in each st
until you reach the marker and work 1 slip st.
Join the second leg with a sc.
Continue crocheting the
BODY
1. You will have 36 sc (slip stitches are not
counted in the total point count)
2. To 10. 1 sc in each st (36).
11. Work in back loops only 1 sc in each st (36).
You will return to this round to complete the
shirt.
12. “4 sc, dec”, repeat to the end of the round
(30).
13. To 25. 1 sc in each st (30).
26. “3 sc, dec”, repeat (24).
27. Change to skin color yarn and work “2 sc,
dec”, repeat (18).
28. To 30. 1 sc in each st (18).
Fasten off.
COMPLETE THE SHOES
With white yarn
Return to round 10 of the legs and holding the
doll with the feet pointing down, work in the
free loops 1 sc in each st (30).
Fasten off.
COMPLETE THE PANTS
With green yarn
1. Return to round 18 of the legs and holding
the doll with the feet pointing up, work in the
free loops 1 sc in each st (18).
2. To 5. 1 sc in each st (18).
Fasten off.
COMPLETE THE SHIRT
With green yarn
1. Return to round 11 of the body and holding
the doll with the feet pointing up, work in the
free loops 1 sc in each st (36).
2. To 5. 1 sc in each st (36).
Fasten off
HEAD
With skin color yarn
1. Work 6 sc in magic ring.
2. Inc in every st (12).
3. “1 sc, inc”, repeat (18).
4. “2 sc, inc”, repeat (24).
5. “3 sc, inc”, repeat (30).
6. “4 sc, inc”, repeat (36).
7. “5 sc, inc”, repeat (42).
8. “6 sc, inc”, repeat (48).
9. “7 sc, inc”, repeat (54).
10. To 17. 1 sc in each st (54).
18. “7 sc, dec”, repeat (48).
19. To 22. 1 sc in each st (48).
23. “6 sc, dec”, repeat (42).
24. 1 sc in each st (42).
25. “5 sc, dec”, repeat (36).
26. 1 sc in each st (36).
27. “4 sc, dec”, repeat (30).
28. “3 sc, dec”, repeat (24).
29. “2 sc, dec”, repeat (18).
30. 1 sc in each st (18).
Fasten off
HAIR
With yellow yarn
1. Work 6 sc in magic ring.
2. Inc in every st (12).
3. “1 sc, inc”, repeat (18).
4. “2 sc, inc”, repeat (24).
5. “3 sc, inc”, repeat (30).
6. “4 sc, inc”, repeat (36).
7. “5 sc, inc”, repeat (42).
8. “6 sc, inc”, repeat (48).
9. “7 sc, inc”, repeat (54).
10. To 12. 1 sc in each st (54).
13. Work 53 sc (leave 1 sc unworked).
14. to 19. Start working in rows. Don’t ch 1.
1 sc in each st (52), (51), (50), (49), (48),
(47).
20. Place the round marker to crochet around
the piece with sc.
Fasten off. Sew it to the head with the
opening forward.
PONYTAIL:
With yellow yarn
1. Work 4 sc in magic ring.
2. 1 sc in each st (4).
3. “1 sc, inc”, repeat (6).
4. To 6. 1 sc in each st (6).
7. “1 sc, inc”, repeat (9).
8. “2 sc, inc”, repeat (12).
9. To 12. 1 sc in each st (12).
13. “3 sc, inc”, repeat (15).
14. “4 sc, inc”, repeat (18).
15. To 18. 1 sc in each st (18).
19. “5 sc, inc”, repeat (21).
20. “6 sc, inc”, repeat (24).
21. and 22. 1 sc in each st (24).
23. “2 sc, dec”, repeat (18).
24. “1 sc, dec”, repeat (12).
Fasten off. Sew the ponytail to the hair.
PONYTAIL HOLDER:
With red yarn
Ch 16 and work 15 sc on the chains
Fasten off. Sew it around the ponytail.
ARMS (x2)
Fingers (4):
With white yarn
1. Work 4 sc in magic ring.
2. To 5. 1 sc in each st (4).
Crochet 3 fingers and fasten off, leave the
fourth finger without fastening off to start
Joining the Fingers:
1. Work 1 sc in the next finger and then 1 sc,
work 1 sc in the third finger and then 1 sc,
work 1 sc in the last finger and then 1 sc.
Crochet 3 sc and repeat the same sequence
on the other side. You will end with 16 st. (4
fingers x 4 sc). (16).
2. “2 sc, dec”, repeat (12).
3. To 6. 1 sc in each st (12).
7. “2 sc, dec”, repeat (9).
8. Change to green yarn and work in back
loops only 1 sc in each st (9). You will return
to this round to complete the gloves.
9. To 25. 1 sc in each st (9).
26. “1 sc, dec”, repeat (6).
Fasten off. Sew the hole with the yarn
needle.
suenhosblanditos.com 9
COMPLETE THE GLOVES
With white yarn
Return to round 8 of the arms and holding
the hands of the doll pointing up, work in the
free loops 1 sc in each st (9).
Fasten off.
Thumb (2):
1. Work 6 sc in magic ring.
2. To 5. 1 sc in each st (6).
Fasten off
EARS (x2)
With skin color yarn
1. Work 6 sc in magic ring.
2. Inc in every st (12).
3. 1 sc in each st (12).
Fasten off.
Fold in half and sew them from the top
attached to the hair, at the height of half the
eyes.
EYES (x2)
With light blue yarn
1. Ch 7 and work 6 sc on the chains.
2. Continue without turning, in the beginning
chains again but in the other side, another 6
sc. You will have 12 sc in all.
3. Place the round marker to start crocheting
in rounds 1 sc in each st (12).
4. Change to white yarn and work 1 sc in each
st (12).
Fasten off.
With black yarn Work 4 sc in magic ring.
Fasten off.
With white yarn embroider the twinkles and
once the eyes are sewn on the face embroider
with black yarn the upper line.
NOSE
With skin color yarn
1. Work 6 sc in magic ring.
2. 1 sc in each st (6).
Fasten off. Sew it centered in relation to the
eyes, in line with the lower part of them.
suenhosblanditos.com 11
COAT
With white yarn
1. Ch 41 and work 40 sc on the chains.
2. To 30. Ch 1, turn and work 1 sc in each st
(40).
Fasten off this part, but it is not necessary to
cut the thread, so continue crocheting to
leave the HOLE OF THE SLEEVES:
For this, divide the 40 sc in the 5 spaces you
need (2 front parts, 2 holes for the sleeves
and the back part). You will use 8 sc in each
space.
Start with one of the front parts:
1. Work 8 sc.
2. To 4. Ch 1, turn and work 1 sc in each st
(8).
Fasten off. Now you can cut the thread.
MOUTH AND EYEBROWS
Embroider the mouth with pink yarn, leaving 2
sc of separation from the nose. It will be 4 sc
in length.
With yellow yarn embroider the eyebrows.
suenhosblanditos.com 12
Crochet the other front part in the same way.
Finally work the part of the back leaving 8 sc
of separation on each side for the sleeves. Do
it in the same way.
1. Complete the coat by joining the 5 spaces
with the 40 sc from which you started. To do
this, on one of the sides of the piece (one of
which corresponds to the front) work 8 sc.
Ch 8 over the hole of the sleeve, 8 sc over the
back, ch 8 over the other hole of the sleeve
and finish with the last 8 sc on the other front,
completing the joining.
2. and 3. Ch 1, turn and work 1 sc in each st
(40).
4. Place the round marker to continue working
around the piece with sc.
Fasten off.
Fold the front part to form the neck flaps and
the nape part in half. Sew it to keep it this
way.
suenhosblanditos.com 13
SLEEVES (x2):
With white yarn
1. Ch 24 and work 1 slip st in the first chain
making a circle.
2. Place the round marker to start crocheting
in rounds 1 sc in each st (24).
3. To 24. 1 sc in each st (24).
Fasten off. Sew them to the holes in the main
piece of the coat.
suenhosblanditos.com 14
POCKETS (x2):
With white yarn
1. Ch 7 and work 6 sc on the chains.
2. To 5. Ch 1, turn and work 1 sc in each st
(6).
6. Place the round marker to crochet around
the piece with sc.
Fasten off.
Fold the first row and sew the pocket leaving
the top loose.
Sew on the sides, at the height of the doll’s
hands, leaving 5 sc of separation from the
edge of the coat.
TOP POCKET:
With white yarn
1. Ch 4 and work 3 sc on the chains.
2. and 3. Ch 1, turn and work 1 sc in each st
(3).
4. Place the round marker to crochet around
the piece with sc.
Fasten off. Sew on the left side, at chest
height, leaving 5 sc of separation from the
edge of the coat.
suenhosblanditos.com 15
MASK
With green yarn
1. Ch 15 and work 14 sc on the chains
2. Ch 1, turn and work 1 sc in each st (14).
3. to 5. Don’t ch 1, turn and work 1 sc in each
st until you reach the last 2 sc, then dec 1.
(12), (10), (8), (6).
7. Place the round marker to start crocheting
in rounds with sc.
8. Change to white yarn to crochet around
the piece with sc and start working the cords.
To do this, when you reach each corner of the
round, ch 17, and 16 sc on the chains joining
to the piece with a slip stitch.
Continue to the end of the round making the 4
cords.
Fasten off
suenhosblanditos.com 16
CAP
With green yarn
1. Work 6 sc in magic ring.
2. Inc in every st (12).
3. “1 sc, inc”, repeat (18).
4. “2 sc, inc”, repeat (24).
5. “3 sc, inc”, repeat (30).
6. “4 sc, inc”, repeat (36).
7. “5 sc, inc”, repeat (42).
8. “6 sc, inc”, repeat (48).
9. “7 sc, inc”, repeat (54).
10. “8 sc, inc”, repeat (60).
11. “9 sc, inc”, repeat (66).
12. “10 sc, inc”, repeat (72).
13. To 22. 1 sc in each st (72).
23. 66 sc (leave 6 sc unworked).
24. To 26. Ch 1, turn and work 1 sc in each st
(66).
At the end, in row 26, crochet one of the
cords. To do this, ch 19 and work 18 sc on the
chains. Join to the piece with 1 slip st.
27. Work the last row of 66 sc and at the end
crochet the other cord: ch 19 again and work
18 sc on them. Fasten off with 1 slip st.
suenhosblanditos.com 17
STETHOSCOPE
With black yarn
1. Work 4 sc in magic ring.
2. 1 sc in each st (4).
3. Change to light gray yarn and work 1 sc in
each st (4).
4. To 35. 1 sc in each st (4).
36. Change to black yarn and work 1 sc in
each st (4).
37. 1 sc in each st (4).
Fasten off and sew the hole with the yarn
needle.
With light gray yarn
1. Work 6 sc in magic ring.
2. Inc in every st (12).
3. “1 sc, inc”, repeat (18).
4. Work in back loops only 1 sc in each st
(18).
5. “1 sc, dec”, repeat (12).
6. Dec in every st (6).
7. and 8. 1 sc in each st (6).
9. Change to black yarn and work 1 sc in each
st (6).
10. To 30. 1 sc in each st (6).
suenhosblanditos.com 18
From this round you have to divide the piece
into 2. There will be 3 sc for each one of the
parts:
1. The starting position is important, which will
be the sc with the round marker. Work 1 sc in
the next st and work 1 sc in the previous st to
the mark. Finish the round with 1 sc in the
marked sc. In this way you will have the 3 sc
on which you will continue working to form
the first half of the round.
2. To 10. 1 sc in each st (3).
Fasten off.
Repeat in the other side:
You have 3 sc unworked in the other half. Join
in the central st and place there the round
marker. From here, continue in the same way
that you did before.
Once this second part is over, don’t cut the
thread but continue working: ch 16 and join to
the first part with 1 slip stitch. In this way you
connect the two parts with the last piece that
you will use to join the stethoscope:
1. To 3. Ch 1, turn and work 1 sc in each st
(16). To better secure the piece, at the end of
the 3 rows join with 1 slip stitch over each of
the halves.
Fasten off.
Sew to the first piece that you crocheted with
a U shape.

